Powered by Blogger.

The model 3

18 Nov 2013

The light of the interior had "break down" the roof into pieces and create the fragment like pieces.Combining the core will create the "tree" of the house. Special designed core also allow the rain water collected at the roof will flow smoothly into the house just like the house get nutrients. It also give a water drop sounds and feeling to create the bush and country side feel. The whole roof area are now accessible and let Miranda Kerr enjoy the sun, the sky and the natural in anytime.

Exterior:


Interior:


" What the beautiful night!"


" Just enjoy the silence at the roof"


" I can be a star!"

"...but i am just a model"

" Run ! i don't want to see him"
" Umm is she ok?"
" Brace yourself! Mother-in-law is coming!"

"Run! Run! Run!" 


" How come there are so many people in my house?"

" Is him again! Please help me!"


Actually no one in the house...

Weight:


Using both traditional and digital bath scale still cannot sense any weight,as long as i do not have a high sensible balance it is hard to conclude with its weight.

Virtual 3D Model

3DBin:


(Try use the mouse to drag to turn the model)

3D Bin (link) i found is quite useful and quickly help you to generate a 3D view of your model.

Just simply create an account and upload the pictures and you can download the link and post anywhere.

123D Catch:

123D Catch can do the same job, however it need more care and consideration to capture your model.


After a long time waiting and still need to manually match the point for those the program cannot recognize. However it will have you more opportunity to view the model and export to Youtube.

SolidWorks trial

It is my first time to use Solidwork. I heard most of the industrial designer and student will use this a lot. So it is worth to give a try.


I had made a mistake when i choosing the reference plan and a bit lost which is the top ( seems the axis system is different from sketchup?) Therefore as shown below the abnormal shadow appear.


I just simply using two planes and draw the shape i want. Although it is fine to just use loft to join them together but i want to control the curve and how they join i use 3D sketch method to have a reference line for the loft to join.

At first, i still keeping my "sketchup thinking method" when i using Solidwork which is quite wrong. Because i think how i can import the shape of void and import to the loft i just made and try to intersect them but i fail to find "import" method. However i found Revolved Cut will just simplify all i want and do it in few steps.


Actually it is not so important for me to abject the way of the model due to it will print upside down to make sure it 3D print properly.


Setting:

Temp: 250 oC
Shell: 1
Infill: 0%

Due to i want to install light into the print so i have make the infill to zero. I did test it before and it is comfortably strong and reliable.


It actually just like "export" from the computer to the reality.

Rhino Grasshopper Trial 3

17 Nov 2013

I have no idea how to make the rigid origami for my roof so i try searching on the internet which i guess grasshopper may help for the situation. Here is the closest one i get:


However it is just a simulations how it works. after i have further research i found it is a research topic in some university in the world. So i just try to work on a simpler method by making prototype..


Still feel fun on rigid origami and how amazing is that!

Working progess (Superstructure)

From the concept of lightness and natural, paper may suggest the possibility to create that. a 2D paper cannot have spacial element there for fold out some space is needed. by folding Rigid Origami is a topic that human investigate  math and physic. Which i started from this way.


Roof:

As in the grasshopper attempt of Rigid Origami, i try making prototype. 

To do so i try learning mountain fold and valley fold from a random paper. I trace the "peck" and find out they do have some pattern of geometry but not so obvious. However triangle is a possible choice to recreate the sense of space with its lightness.


Just paper and masking type to make the designed form and it successfully back to flat or 2D. (staple boxes are just for temporary support.)

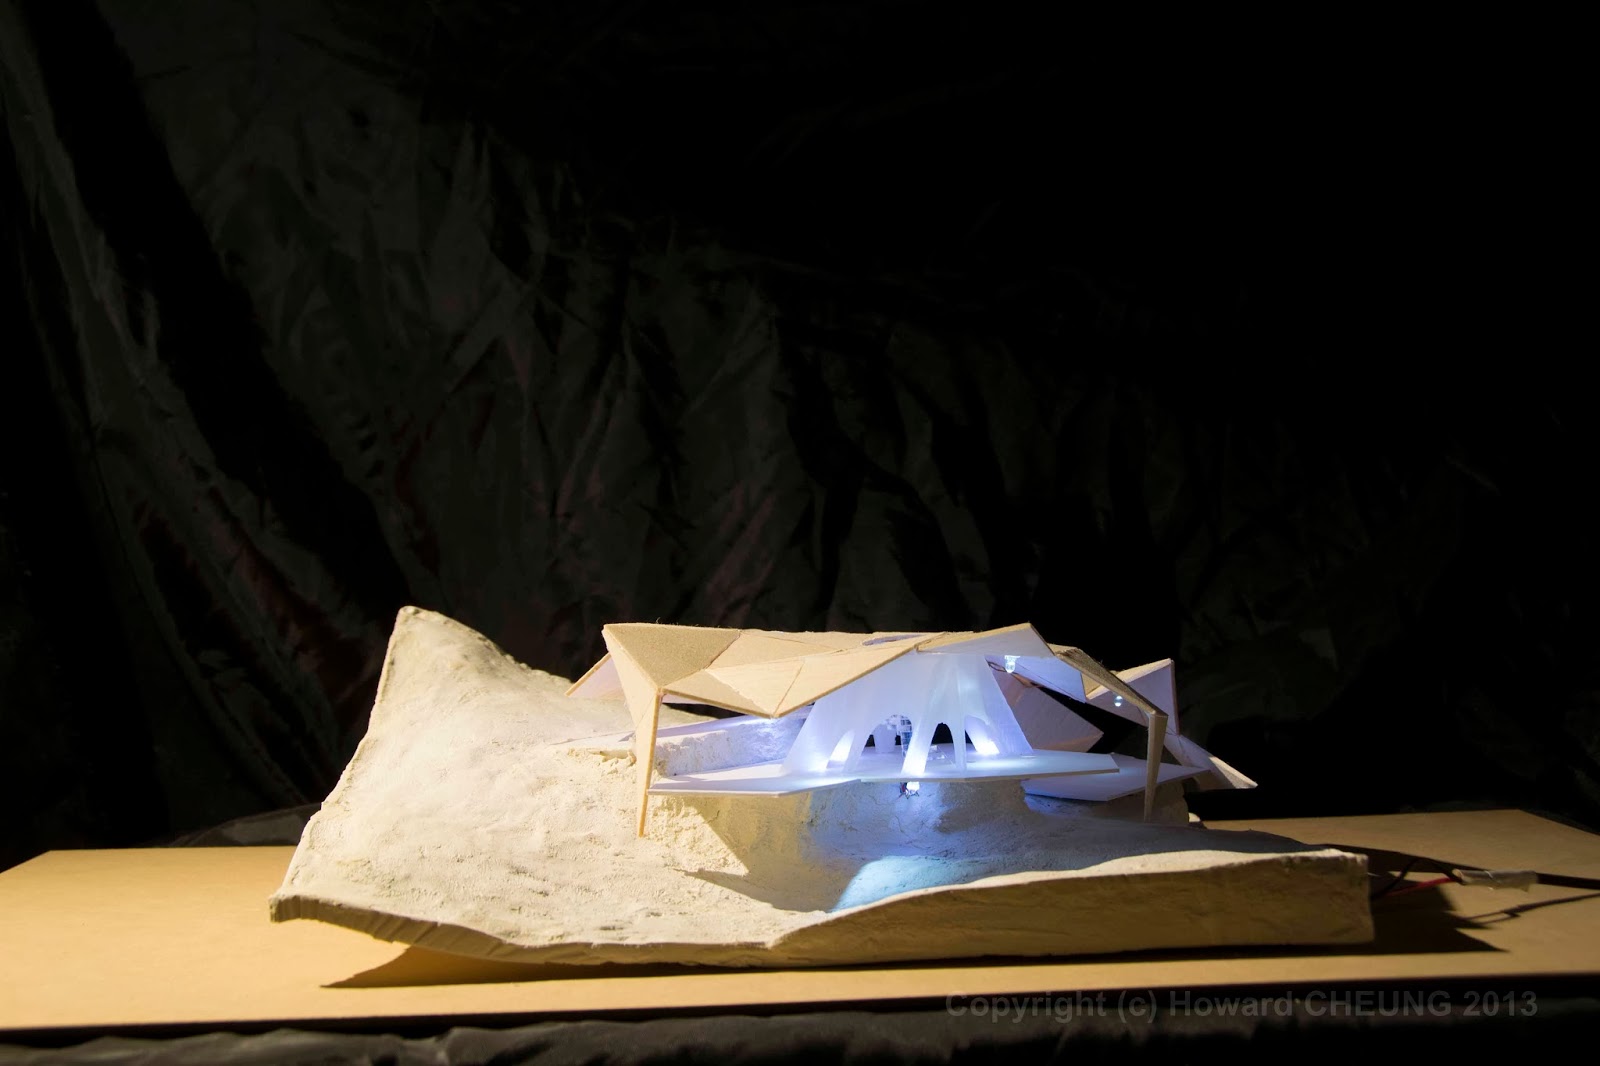
I do think of re create the form into on piece and laser cut it . However i want to give the roof structure more lightness and light can penetrate through the roof so i have keep using the same method when i build the prototype. Using balsa as in represent the timber structure of the roof. It is a reasonable material that give the lightness and it is natural.


In some parts need to angle the balsa in order to match the angle of the flow. 1st method i use is just cut by knife and it is so dangerous and risky to cut the fingers. So i try using the sand paper with block to sand out the angle i want. 


The only problem is the installation of LED light at the ceiling. They need to carefully located and with the cables detour in order not to block the light going through the gaps but not create shadow at the center of each piece of balsa.


Remove the plastic protection off the cable. Sometime do feels like i am doing surgery ...

In this model i had use the 3mm LED on the right (left is 5mm normal LED) to minimize the impact from the LED circuit. 

Roof socket:

Another problem is the different system of circuit. I want to separate the ceiling and floor circuit and the roof is removable for me to take picture easily. Therefore a tiny socket is needed.
3D printed 2mm (W) X 1mm (H) X 3mm (D) sockets.

After Assembly all the parts and as show on the imagine above the ceiling light turned off  but the floor still on when the socket is disconnected.

Central structure:

In Other to lift out the roof structure, the central core need to be strong enough. Suggested using semi transparent concrete and in this model i have use semi transparent PLA to 3D print the designed tree trunk like core structure in Solidwork.

Central structure stair case:

Lase cut the acrylic steps.

Apply UHU carefully could stick two acrylic clearly. I just wounder it is better to stick two pieces  not in the same face, i.e. top face stick to the bottom face of other piece. Looks like there are less resistance and stick even better in this way.


Copyright © 2013. SUPER ‧ MODEL - All Rights Reserved
Proudly powered by Blogger